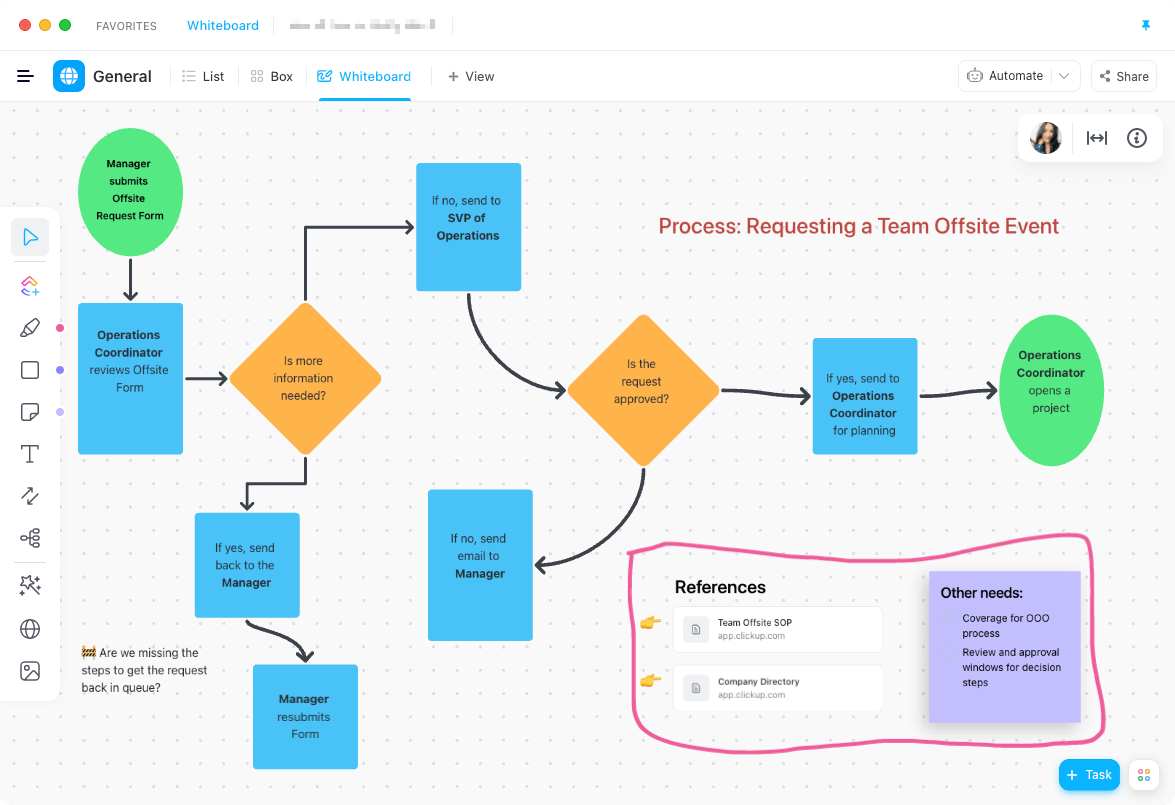
Flowcharts are an essential tool for visually representing processes, workflows, and systems in a clear and easy-to-understand manner. Microsoft Word offers a range of features for creating flowcharts, making it a popular choice for many users. In this article, we will guide you through the step-by-step process of creating a flowchart in Microsoft Word, from selecting the appropriate flowchart shape to formatting and connecting shapes to create a complete and professional-looking flowchart. Whether you are a student, business professional, or simply looking to create a visual representation of a process or system, this guide will help you create how to make flowchart in Word that effectively communicates your ideas and information.
What is Microsoft word
:max_bytes(150000):strip_icc()/ms-word-5aa0180ceb97de0036612567-f356870fe73d4c71857a9e534f6ce331.png)
Microsoft Word is a word processing software developed by Microsoft Corporation. It is one of the most widely used word processing applications in the world and is part of the Microsoft Office suite of productivity software. Microsoft Word allows users to create, edit, and format documents, ranging from basic letters and memos to more complex documents such as reports, resumes, and books. It offers a range of features including spell-checking, grammar-checking, formatting tools, the ability to insert images and tables, and collaboration features that allow multiple users to work on the same document simultaneously. With its user-friendly interface and powerful tools, Microsoft Word has become an essential tool for many students, professionals, and businesses around the world to know how to make flowchart in word
Is there a flowchart template in Word?
Yes, Microsoft Word offers a range of flowchart templates that you can use to create flowcharts quickly and easily. To access the flowchart templates in Word, you can follow these steps:
- Open a new Word document.
- Click on the “Insert” tab at the top of the screen.
- Click on the “Shapes” button and select “Flowchart” from the drop-down menu.
- Choose the type of flowchart that you want to create from the list of available templates.
Alternatively, you can search for additional flowchart templates by clicking on “New” and typing “flowchart” into the search bar. This will bring up a selection of pre-designed flowchart templates that you can choose from. Once you have selected a template, you can customize it to fit your specific needs and preferences by adding or deleting shapes, changing the colors and formatting, and adding text and other elements as needed.
Procedure to create a flowchart in Word or Excel
Here is a step-by-step guide on how to make flowchart in Word or Excel:
- Identify the process you want to represent in the flowchart and determine the steps or actions involved.
- Open a new Word or Excel document and go to the “Insert” tab.
- Click on the “Shapes” button and select “Flowchart” from the drop-down menu.
- Choose the shape that represents the start of your process, such as a “Process” or “Terminator” shape.
- Click and drag the shape onto the document, and then type in the name of the process or action that it represents.
- Add additional shapes to the document to represent the remaining steps or actions in the process.
- Connect the shapes together using the “Connector” tool. Click and drag the connector from one shape to another to create a line connecting the two shapes.
- Label the connectors with arrows or other symbols to indicate the direction of the flow.
- Add text boxes to each shape to provide more information about each step or action in the process.
- Customize the flowchart by changing the color, shape, and style of the shapes and connectors, as well as the font and color of the text.
- Once you have finished creating the flowchart, save the document and print or share it as needed.
Note that the exact steps may vary slightly depending on the version of Word or Excel you are using. However, the basic process of creating a flowchart is the same across all versions.
How do I make a flowchart in Microsoft Word?
Here’s how you can make a flowchart in Microsoft Word:
- Open a new Word document and go to the “Insert” tab.
- Click on the “Shapes” button and select “Flowchart” from the drop-down menu.
- Choose the shape that represents the start of your process, such as a “Process” or “Terminator” shape.
- Click and drag the shape onto the document, and then type in the name of the process or action that it represents.
- Add additional shapes to the document to represent the remaining steps or actions in the process.
- Connect the shapes together using the “Connector” tool. Click and drag the connector from one shape to another to create a line connecting the two shapes.
- Label the connectors with arrows or other symbols to indicate the direction of the flow.
- Add text boxes to each shape to provide more information about each step or action in the process.
- Customize the flowchart by changing the color, shape, and style of the shapes and connectors, as well as the font and color of the text.
- Once you have finished creating the flowchart, save the document and print or share it as needed.
You can also use Microsoft’s pre-designed flowchart templates to save time and effort. Simply select the “Flowchart” option in the “Shapes” dropdown, then choose the template that best suits your needs. The templates come with pre-made shapes and connectors, which you can easily edit and customize to fit your specific process or workflow.
Word flowchart template

Microsoft Word offers a variety of pre-designed flowchart templates that you can use to create professional-looking flowcharts quickly and easily. Here’s how to access these templates:
- Open a new Word document.
- Click on the “Insert” tab at the top of the screen.
- Click on the “Shapes” button and select “Flowchart” from the drop-down menu.
- Choose the “Flowchart templates” option from the list of available shapes.
- A range of pre-designed flowchart templates will appear in the dropdown menu. Choose the one that best suits your needs and click on it to insert it into your document.
- Customize the flowchart by adding, deleting, or modifying shapes and connectors to represent your specific process or workflow.
- Add text to each shape to describe the steps or actions involved in the process.
- Once you have finished creating the flowchart, save the document and print or share it as needed.
Using a pre-designed flowchart template can save you time and effort, as the basic structure and design of the flowchart is already in place. You can simply modify the template to fit your specific needs and preferences, rather than starting from scratch.
Flowchart in word 2010
Here’s how you can make a flowchart in Microsoft Word 2010:
- Open a new Word document.
- Click on the “Insert” tab at the top of the screen.
- Click on the “Shapes” button and select “Flowchart” from the drop-down menu.
- Choose the shape that represents the start of your process, such as a “Process” or “Terminator” shape.
- Click and drag the shape onto the document, and then type in the name of the process or action that it represents.
- Add additional shapes to the document to represent the remaining steps or actions in the process.
- Connect the shapes together using the “Connector” tool. Click and drag the connector from one shape to another to create a line connecting the two shapes.
- Label the connectors with arrows or other symbols to indicate the direction of the flow.
- Add text boxes to each shape to provide more information about each step or action in the process.
- Customize the flowchart by changing the color, shape, and style of the shapes and connectors, as well as the font and color of the text.
- Once you have finished creating the flowchart, save the document and print or share it as needed.
Word 2010 also offers pre-designed flowchart templates that you can use to create flowcharts quickly and easily. Simply follow the same steps as above, but choose the “Flowchart templates” option from the “Shapes” drop-down menu to access the templates.
How to edit flowchart in word
To edit a flowchart in Word, you can follow these steps:
- Open the Word document that contains the flowchart you want to edit.
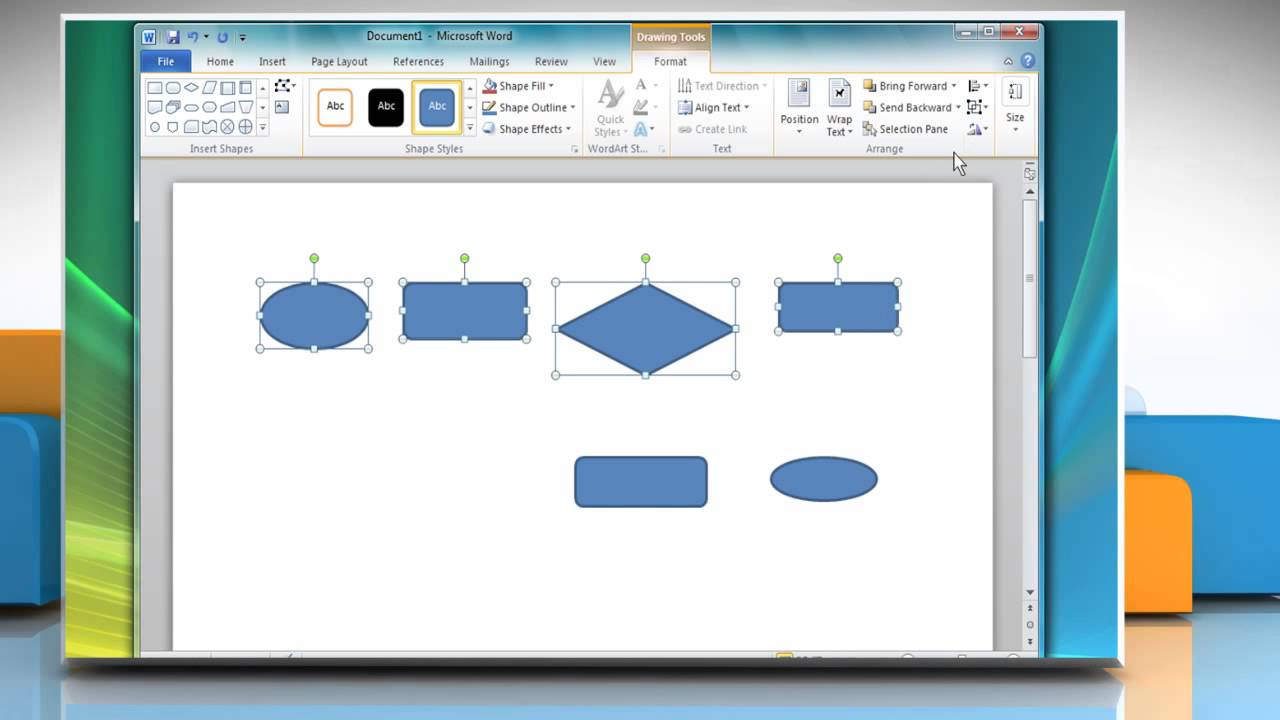
- Click on the flowchart to select it. You will see that the shapes and connectors in the flowchart become outlined in green, and small circles called “handles” appear around the edges of each shape.
- To move a shape, click and drag it to a new location. You can also resize a shape by clicking and dragging one of its handles.
- To add a shape, click on the “Insert Shape” button in the “Shapes” menu, and choose the shape you want to add. Click and drag the new shape to the desired location in the flowchart.
- To delete a shape, select it and press the “Delete” key on your keyboard.
- To change the style or formatting of a shape, select it and choose the desired style or formatting options from the “Shape Styles” menu in the “Format” tab.
- To change the text of a shape, double-click on it to activate the text box, and then type in the new text.
- To add or modify connectors between shapes, select the “Connector” tool from the “Shapes” menu, and click and drag to create a new connector. To modify an existing connector, click on it to select it, and then click and drag one of its endpoints to a new location.
Once you have finished editing the flowchart, save the document and print or share it as needed.
How to create a flowchart in word 2016
Here’s how you can create a flowchart in Word 2016:
- Open a new Word document.
- Click on the “Insert” tab at the top of the screen.
- Click on the “Shapes” button and select “Flowchart” from the drop-down menu.
- Choose the shape that represents the start of your process, such as a “Process” or “Terminator” shape.
- Click and drag the shape onto the document, and then type in the name of the process or action that it represents.
- Add additional shapes to the document to represent the remaining steps or actions in the process.
- Connect the shapes together using the “Connector” tool. Click and drag the connector from one shape to another to create a line connecting the two shapes.
- Label the connectors with arrows or other symbols to indicate the direction of the flow.
- Add text boxes to each shape to provide more information about each step or action in the process.
- Customize the flowchart by changing the color, shape, and style of the shapes and connectors, as well as the font and color of the text.
- Once you have finished creating the flowchart, save the document and print or share it as needed.
Word 2016 also offers pre-designed flowchart templates that you can use to create flowcharts quickly and easily. Simply follow the same steps as above, but choose the “Flowchart templates” option from the “Shapes” drop-down menu to access the templates.
Create flowcharts online
There are several online tools that you can use to create flowcharts. Here are a few options:
- Lucidchart:
This is a popular online diagramming tool that allows you to create flowcharts, as well as other types of diagrams. It offers a wide range of shapes, templates, and customization options, and allows you to collaborate with others in real time.
- Draw.io:
This is a free, open-source diagramming tool that offers a user-friendly interface and a variety of shapes and connectors for creating flowcharts. It also allows you to export your flowchart in various file formats, such as PNG, JPG, PDF, and SVG.
- Creately:
This is another online diagramming tool that offers a range of templates, shapes, and connectors for creating flowcharts. It also allows you to collaborate with others in real time and share your flowchart with others.
- Gliffy:
This is an easy-to-use online diagramming tool that offers a drag-and-drop interface for creating flowcharts. It also offers a range of customization options, such as colors, fonts, and styles.
To create a flowchart using any of these tools, simply sign up for an account, choose the flowchart template or start with a blank canvas, drag and drop shapes onto the canvas, connect them using connectors, and add text and labels as needed. You can then customize the colors, fonts, and styles to match your preferences, and save or export the flowchart to share with others.
Advantages of making flowchart in word
There are several advantages to creating a flowchart in Word:
- Easy to use:
Word is a widely used and familiar application, so creating a flowchart in Word is a straightforward and intuitive process.
- Customizable:
Word offers a range of shapes, connectors, and formatting options, allowing you to customize your flowchart to match your specific needs and preferences.
- Accessibility:
Word is available on most computers and can be easily shared with others, making it a convenient tool for collaborating on flowcharts and sharing them with others.
- Integration with other applications:
Since Word is part of the Microsoft Office suite of applications, it can easily be integrated with other Microsoft applications, such as Excel and PowerPoint, allowing you to create more complex and detailed flowcharts.
- Cost-effective:
Creating a flowchart in Word does not require any additional software or tools, making it a cost-effective option for creating basic flowcharts.
Faqs
Here are some frequently asked questions about how to make a flowchart in Word:
Q.1 What version of Word do I need to create a flowchart?
You can create a flowchart in any version of Microsoft Word, including Word 2010, Word 2013, Word 2016, and later versions.
Q.2 What shapes and connectors are available in Word?
Word offers a variety of shapes and connectors, including rectangles, diamonds, ovals, and arrows. You can also customize the size, color, and style of each shape and connector.
Q.3 Can I import a flowchart from another application into Word?
Yes, you can import a flowchart created in another application, such as Visio or Draw.io, into Word by copying and pasting the image or exporting the flowchart as an image file and inserting it into Word.
Q.4 How can I connect shapes in Word?
To connect shapes in Word, select the shape you want to connect, click on the “Insert” tab, select “Shapes,” and choose the connector shape you want to use. Then click and drag from the first shape to the second shape to create the connector.
Q.6 Can I customize the formatting of a flowchart in Word?
Yes, Word offers a range of formatting options, including font styles, colors, and line thickness, that you can use to customize the appearance of your flowchart.
Q.7 Can I add text to my flowchart in Word?
Yes, you can add text to your flowchart by selecting the shape you want to add text to, clicking on the “Insert” tab, and selecting “Text Box.” You can then enter your text into the text box and customize the font and formatting as desired.
Conclusion
In conclusion, creating a flowchart in Word is a simple and effective way to visualize and communicate complex processes and workflows. With a variety of shapes, connectors, and formatting options available, you can customize your flowchart to match your specific needs and preferences. Additionally, Word is widely used and familiar, making it a convenient tool for collaborating on flowcharts and sharing them with others. Whether you are a business professional, a student, or a casual user, creating a flowchart in Word can help you better understand and communicate complex ideas and processes.